
DIY Like A Pro With 45 Handy Tool Hacks
One thing that has been used as a sign of intelligence is the capacity to utilize tools. By this, we mean that humankind has been using and developing tools for centuries. Although we have evolved past stones, our use of tools has not faded. And with the entire internet at our fingertips, it’s easy to be inspired by DIY projects and home fix-it solutions. With a trip to the hardware store, anyone can make a project or repairs without needing a professional. Although most tools are straightforward to use, there are dozens of ways to make the job easier and more enjoyable. You just need to know the right workarounds. We’ve compiled a list of 45 hacks that even newbies can use to make DIY tasks easier.
1. Drills Are Perfect for Digging the Ground in Wintry Conditions
Setting up outdoors in the winter comes with its own challenges. The main issue is the freezing cold ground which can make it difficult to set poles or signposts in the ground. It’s possible to do with regular digging tools, but it’s twice as hard.
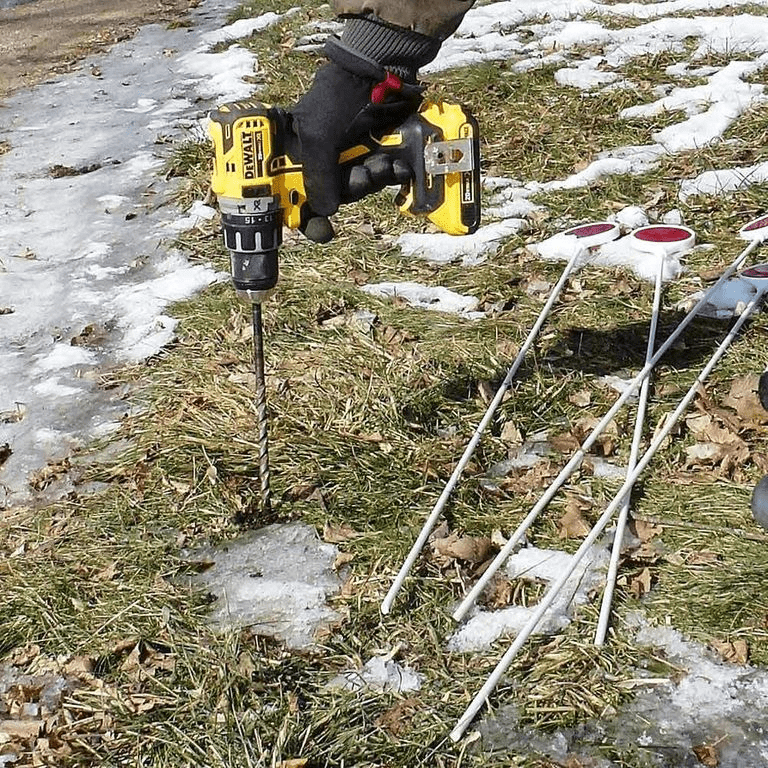
Making trenches with tools like diggers and shovels is a colossal waste of effort. For better results, use a hand drill instead. The single-pointed pressure creates holes in the ground much faster. It’ll be as seamless as drilling through the drywall.
2. Caulk Guns Serve Mini Projects
Working on small projects, it can be difficult to keep all the pieces together. If not properly bound, you may end up with a disappointing finish that doesn’t match your vision for the project from the start. There’s an easy workaround to avoid this letdown.

If you’re working on a mini-project and a regular clamp doesn’t suit the task, try opting for a Caulk Gun. Their size is better adapted for smaller sized projects. You can now hold your workpieces together nice and easy, and get the final results you always dreamed of.
3. Holding Paint Can Openers
Time squandered searching for MIA tools in a workshop is frankly upsetting. When you consider the amount of meaningful work that could have been accomplished, it helps to always have the necessary tools at your disposal. That’s why it’s helpful to know hacks like these to get around missing tools without wasting too much time.
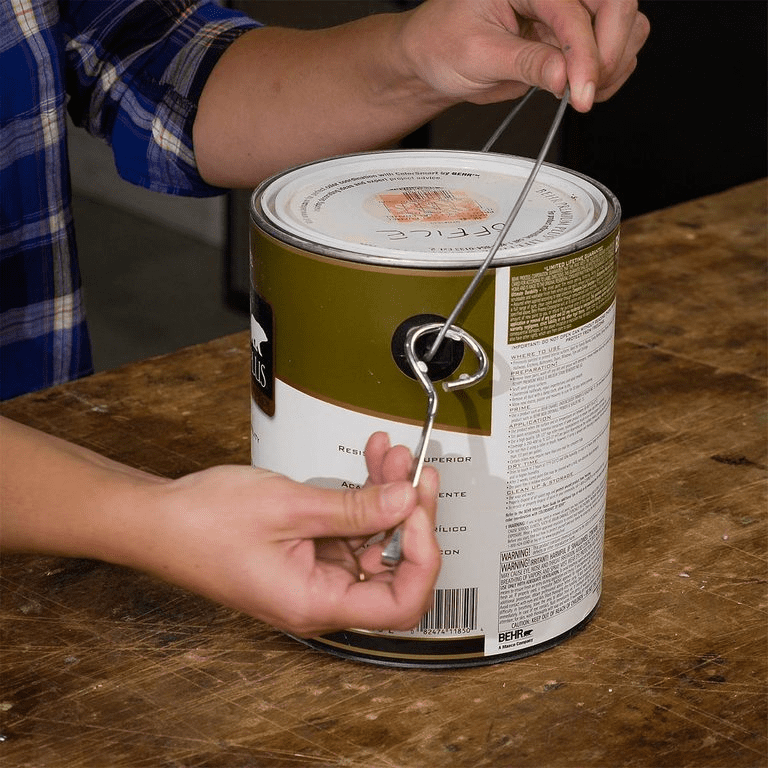
The paint can opener is one of many tools to go missing often, given its relatively small size. We have a trick that could help you never lose your paint can opener again. Give allowance by folding the loop of the opener. With this, you can hook the opener to the handle of your paint bucket.
4. Navigating Your Regular Screwdriver through Dark Areas
Ironically, with bolts and screws, the tiny ones can be the most problematic ones. As a consequence of their sizes, it might be hard to locate them using a screwdriver due to lack of visibility. The solution is pretty simple – a light source.
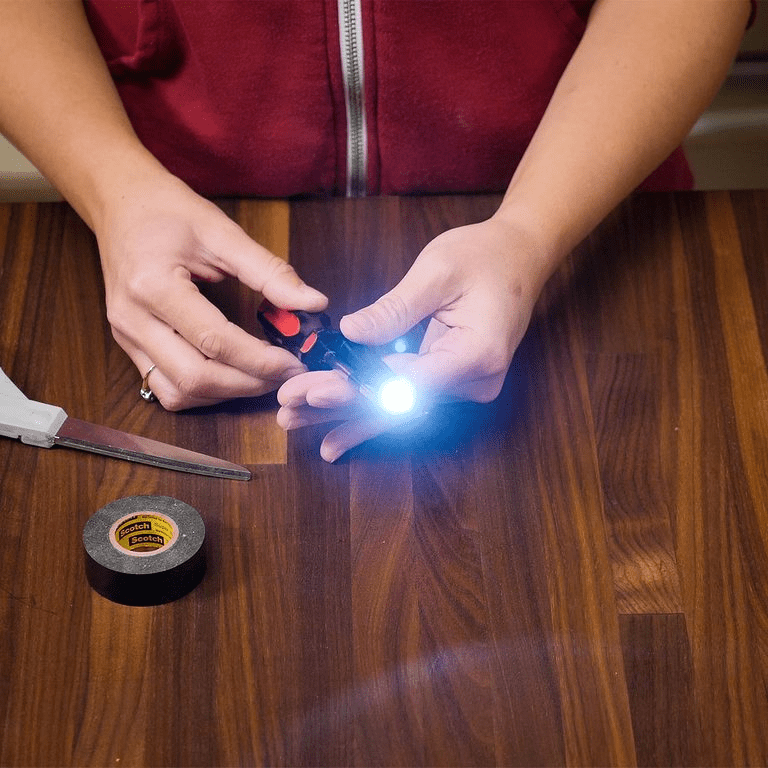
Although this doesn’t mean you have to go through the trouble of looking for another screwdriver that has a built-in light. You can make do with what you have by simply attaching an LED to the shaft of your screwdriver.
5. Rakes As Opposed to Hoes or Shovels
The traditional approach of using a shovel or hoe to stir cement could be a tussle sometimes. Getting a good mix with a hoe isn’t the easiest thing to do. It doesn’t really get to the entire mix and could leave you with an ill-formed paste.
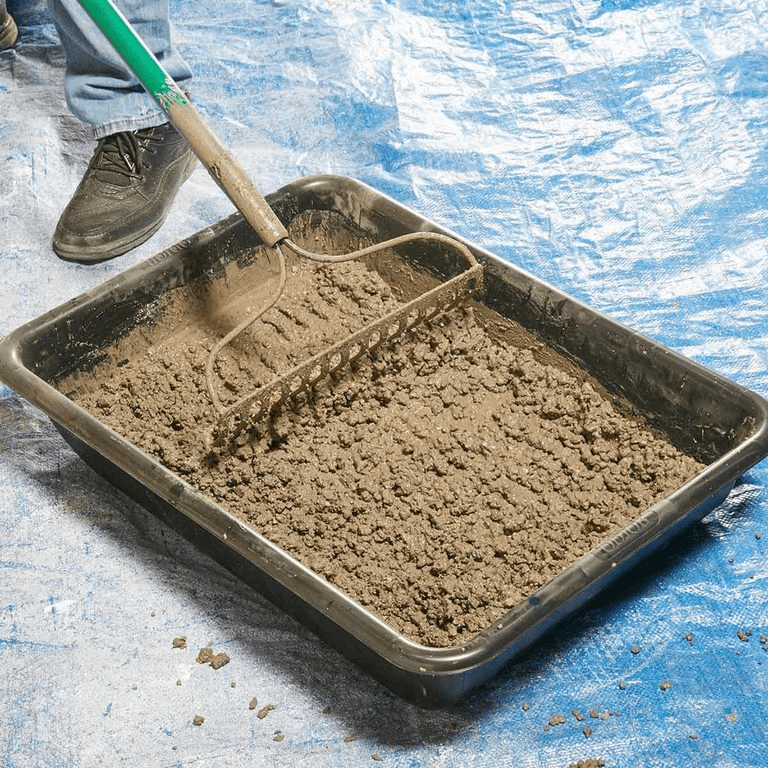
Most people don’t know, but rakes actually do a proper job stirring cement. Thanks to their forked tip which gets into every inch of your cement powder, water, and sand combination; you are more likely to whip a healthy cement paste with a rake.
6. Dealing with Messy Foam
Foam from sofas and other furniture pieces has a way of making the house untidy. As furniture ages, its threads start loosening leading to tongues of foam sticking out of its body. Till you eventually decide to change them, you can manage their appearance in the meantime by cutting out the redundant foam.
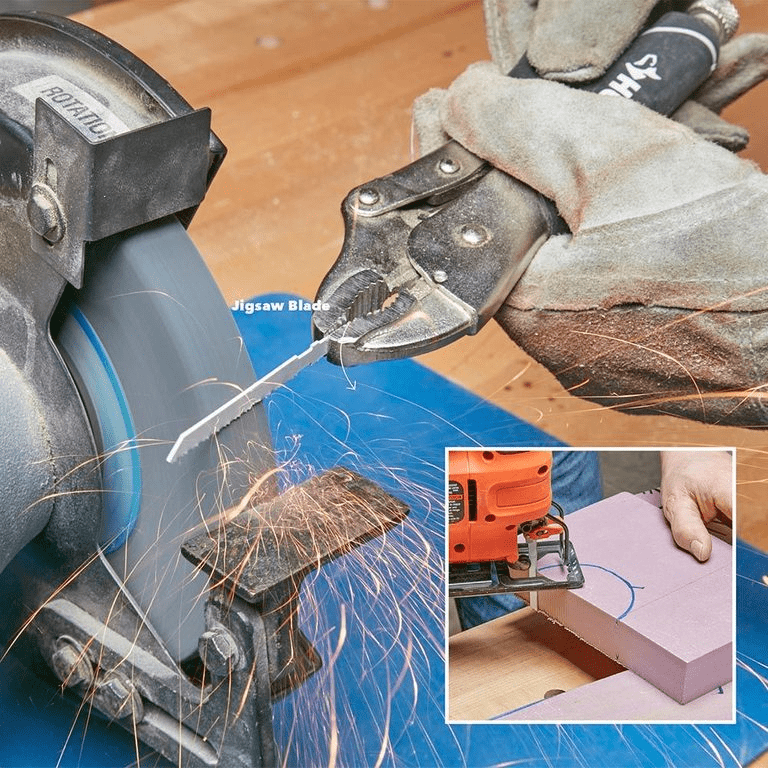
To this end, fashioning a blade proves important. Blades designed for cutting foam should be cut out in a jigsaw shape. To achieve this form, you’ll have to do some filling. Now you now have a blade dedicated to cutting off the messy-looking foam escaping from openings in your furniture.
7. Screwdriver with Screw Magnet
While taking apart fairly large equipment, there is always a risk of losing some screws to gravity. Another problem is positioning the screw in its appropriate slot. We have a hack that will give you better handling with your screwdriver.
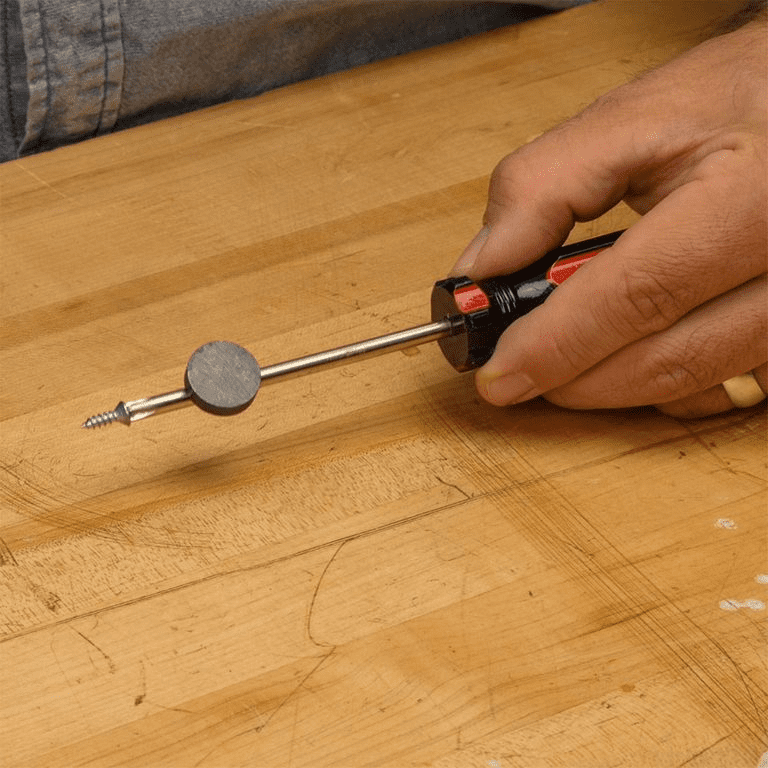
Magnetizing a screwdriver helps you make better maneuvers while working. With a magnet, you can easily retrieve screws from the floor. They assist you by guiding the screw into a dedicated thread. Simply putting a magnet on your screwdriver does the trick.
8. How to Avoid Smashing Your Fingers While Hammering
No project is complete without the use of a hammer. Whether you’re a professional, a DIY aficionado, or simply building some IKEA furniture, hammers are essential to every project. But no matter how handy it is, there’s one risk we’re all aware of: slamming your fingers while working.
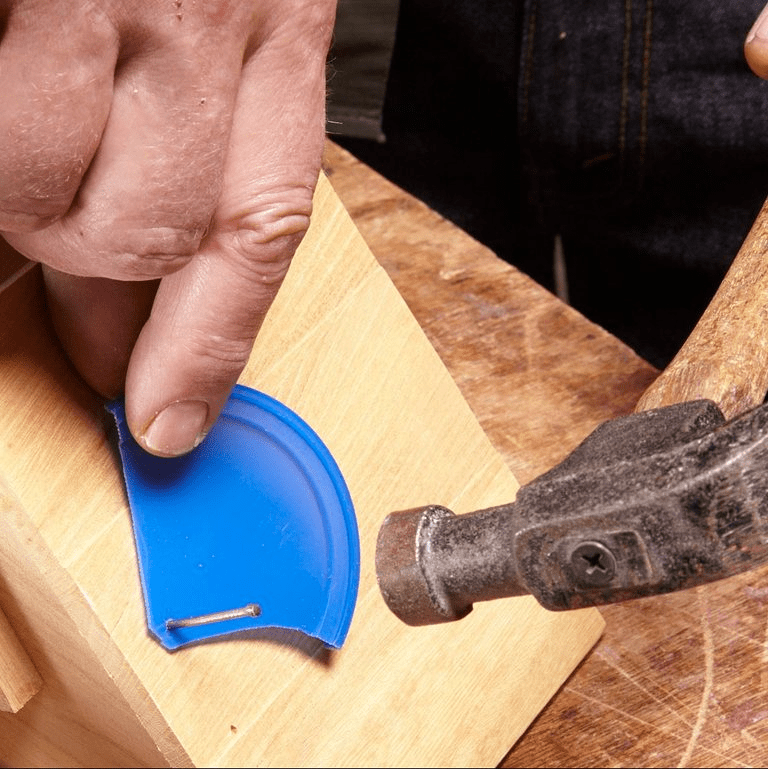
To avoid this mishap and keep your fingers safe, you can stabilize the nail, staple, or whatever you’re trying to hammer in, with a plastic cover. When it’s firmly in, you can cut off the plastic. Now, you don’t need to worry about getting hurt and can enjoy the work.
9. Lifting Heavy Doors
Although doors are usually well-fitted to the doorway, there are some times that they need to be moved or fixed. Doing this alone is extremely difficult; they are heavier than you might think and you need at least one hand free to do the work.
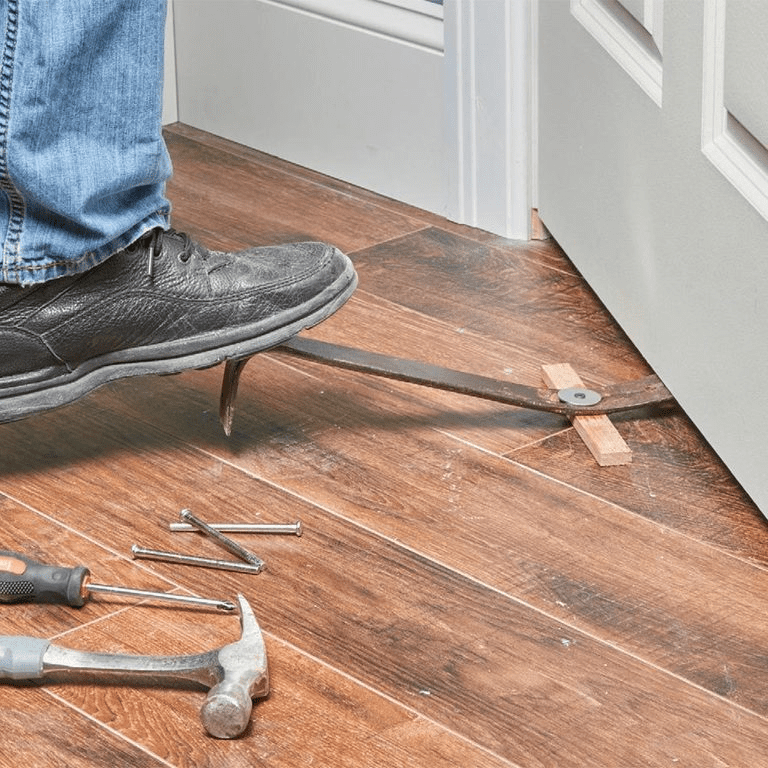
However, despite the weight of any door, there are tools you can leverage to make moving them much easier – a pry bar! The curve provides a fulcrum with the ground, making it possible to lift the door with just your feet. If it’s not at the right angle, try adding a layer underneath to add some extra lift.
10. Missing a Spanner?
If you are the type to take on home repairs by yourself, you probably understand the frustration of reaching for a tool that isn’t there. Missing a tool mid-project can be frustrating and may result in a phone call to a serviceman rather than completing the project yourself.

If your missing tool is a spanner also known as a wrench, there’s an alternative that can let you keep working. To pop out rounded bolts, a wrench will work as an excellent substitute. Its grip and changeable width will handle bolts of any size.
11. Using a Hammer for Measurement
Taking accurate measurements isn’t just for engineers and tailors. Even though DIY projects don’t require professional skills, it’s important to be precise with your measurements to make sure everything fits well and you have a product you can be proud of.
Measuring tapes are standard in any home, but they’re not always available when you need them. If your measuring tape is MIA, a hammer could step in to do a fairly good job. With a hammer of known length, you can make approximations of certain items measured.
12. Getting Those Straight Wood Cuts
Tables serve multiple purposes when working on a project, but in the case of woodwork, they provide a flat surface for cutting large chunks of wood in straight lines. Sometimes, the lines get askew, mostly because the wood isn’t well pinned to the table saw fence.
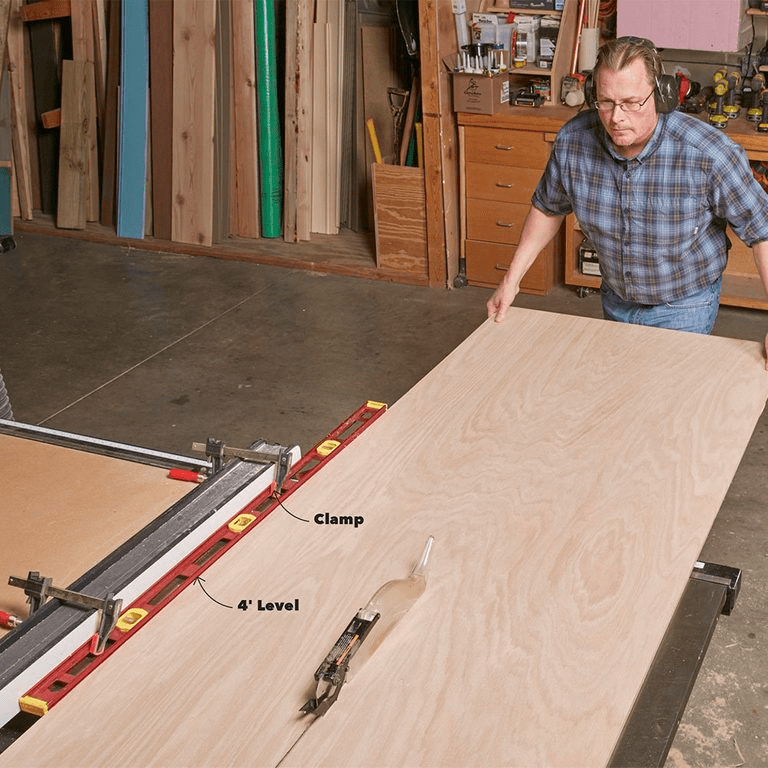
There is a trick to help you achieve straight cuts – layering the table saw fence. By introducing a layer of four feet under your fence, like so in the picture above, you’ll cut in a straighter line. Try this out next time you’re working on a woodworking project.
13. Makeshift PVC Sanding Paper
The internet is filled with a seemingly endless list of DIY projects. But it can be a bummer to have the enthusiasm and be ready to invest time into a project, only to come up short on tools to get the job done.
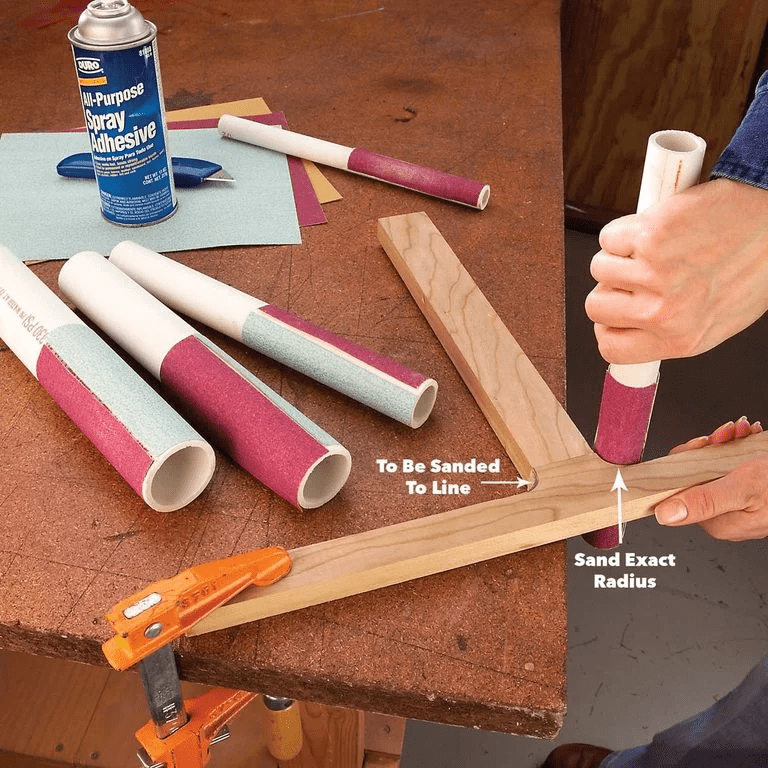
If the project of your dreams involves woodworking, you can substitute professional tools with PVC sanding paper. To make one, all you need is a piece of PVC, glue, and sandpaper. The PVC allows you to have a better grip and helps you get tricky corners.
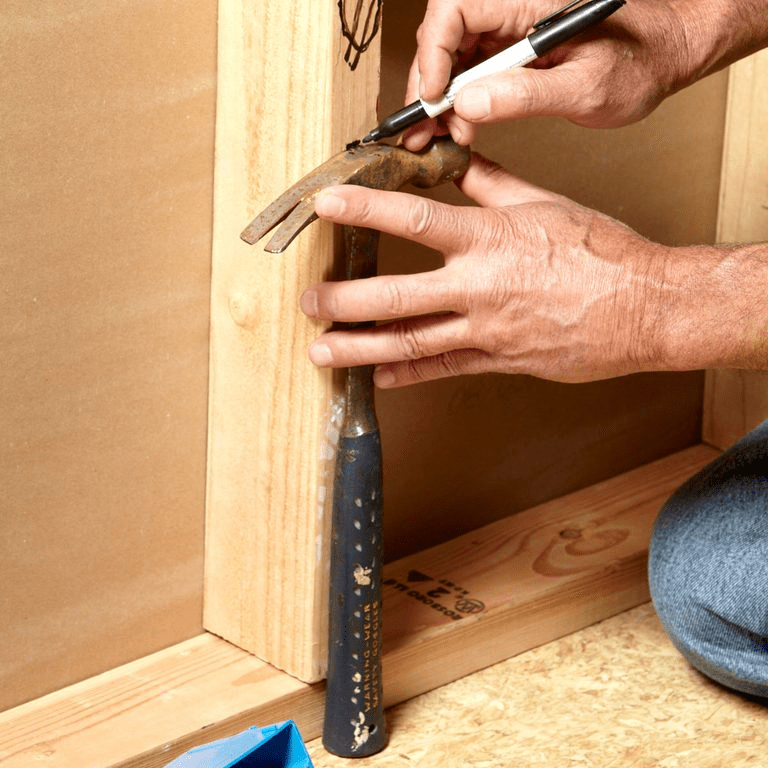
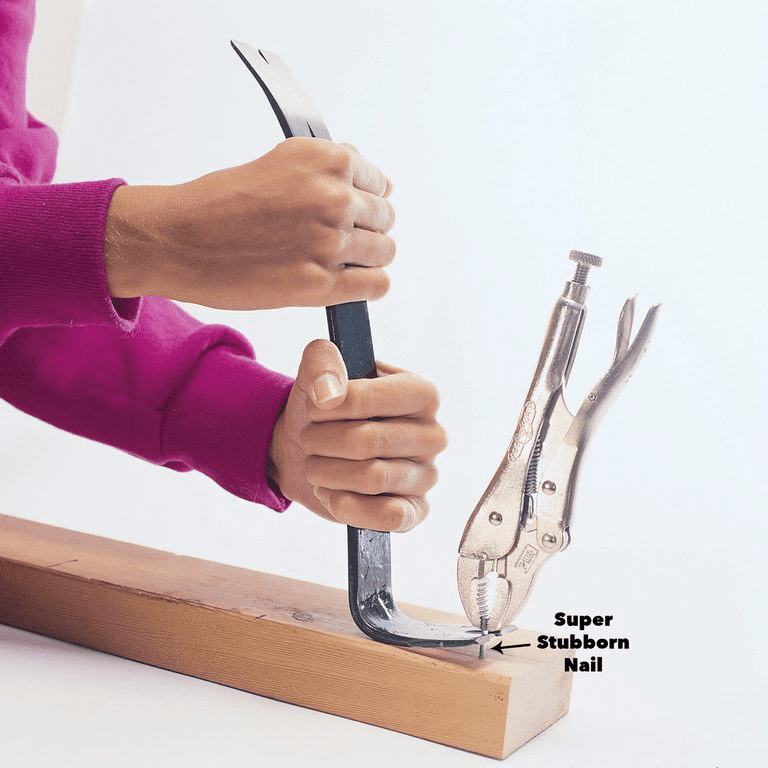
14. Getting Stubborn Nails
Sometimes nails get stuck to an object so firmly that no matter what you do they don’t budge. When they get pinned at awkward angles or lose their shape to a bend, they become highly resistant to removal. In a nutshell, trying to displace a nail can be a very harrowing task.
If you find yourself facing a stubborn nail, don’t worry; we’ve got you. There is a way to improve your leverage for taking out a resilient nail. Simply slipping in a flat object to create some space between the hammer and the surface in which the nail is affixed, should do the trick.
15. Securing Your Fingers While Nailing
We’ve already mentioned the risk of using a hammer. We wouldn’t be surprised if the most common workplace injury was hammering one’s finger. Fortunately, we have another trick to help keep your hands safe. Have you tried using a bobby pin?
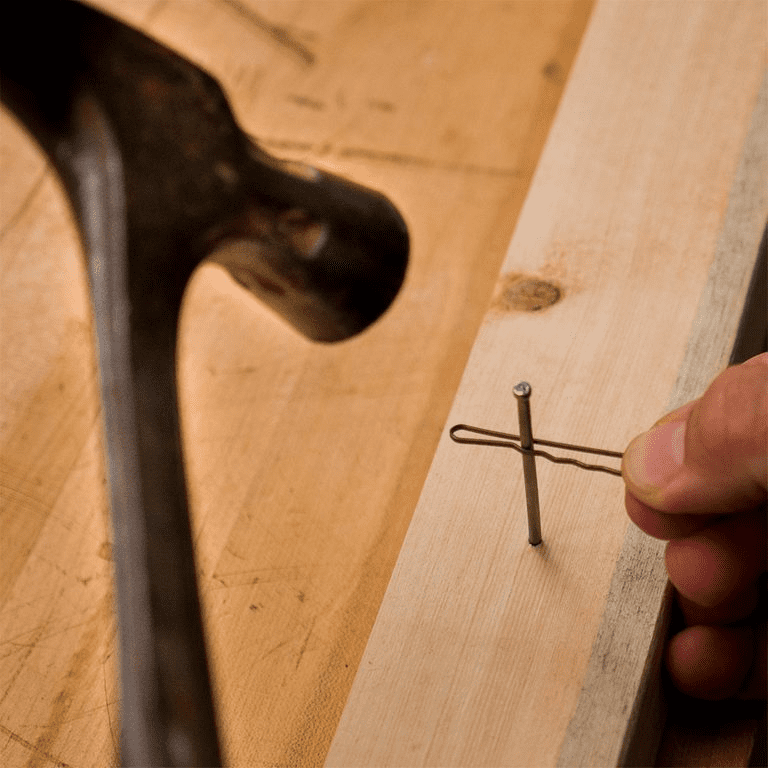
If you don’t have any in your home, they’re an easy dollar store purchase. Instead of putting your fingers on the line, you could use a bobby pin to place the nail in a fixed position. With that, your fingers are out of the way and the only nails getting hammered are the metal ones.
16. Working around Tight Corners in Drywalls
Going to work on drywall means preparing for unwieldy edges and corners. For these hard-to-reach spots, you will need smaller tools that easily insinuate themselves. If you can’t find anything like that in a store, an improvised solution could easily do the trick.
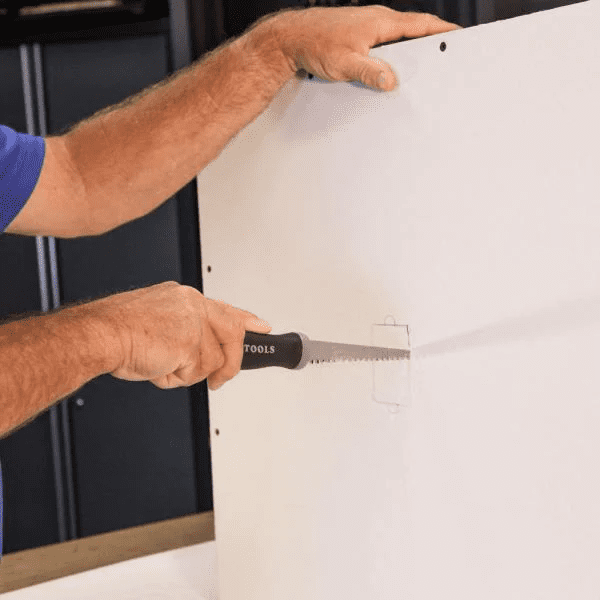
If you have a chunk of wood and a jig-saw blade, you can easily make a mini saw like the one in the picture. All you have to do is stick the jig-saw blade into the wood, which would serve as a handle. There you go, now you have a tiny blade.
17. Save Time with Nail Guns
The purpose of hacks is to explore shortcuts to make things easier and get the job done with ease. They aim to reduce expended effort, time, or money. In some other cases, they improve the efficiency of work done and provide a safer workspace.
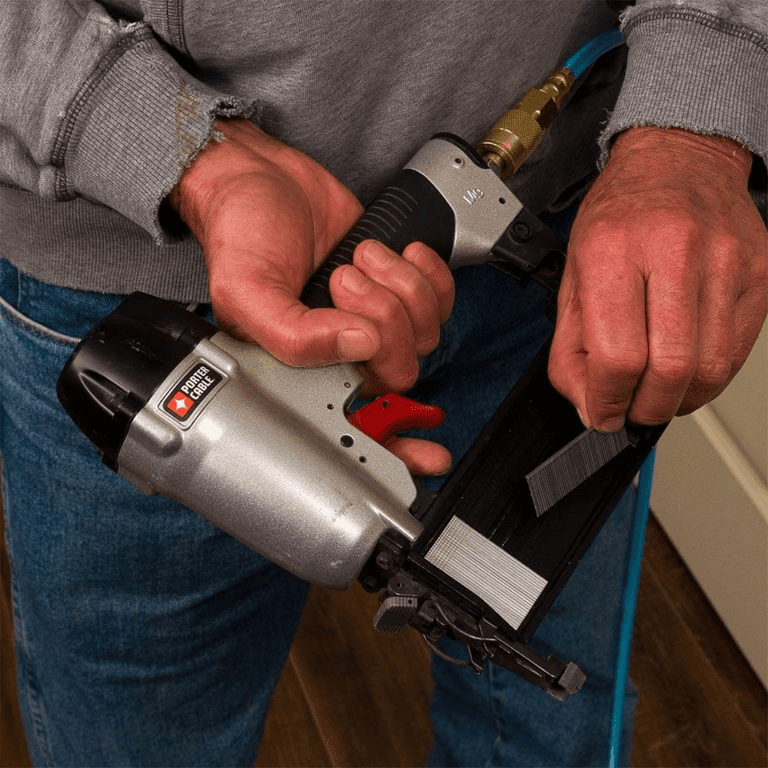
If you’ve ever used a hammer, then you’d know that it can take some time and effort to get a nail properly set in place. With thicker materials, it can take even longer. If used safely, nail guns cut down the workload to a fraction of the time.
18. Clamping Boxes with Ease
Clamping a box is one of the most meticulous tasks you can find yourself doing. The most important thing to keep in mind is accuracy; sizing all the parts with the right dimensions. After that, it’s key to make sure that all the edges line up while you’re putting the different parts together.
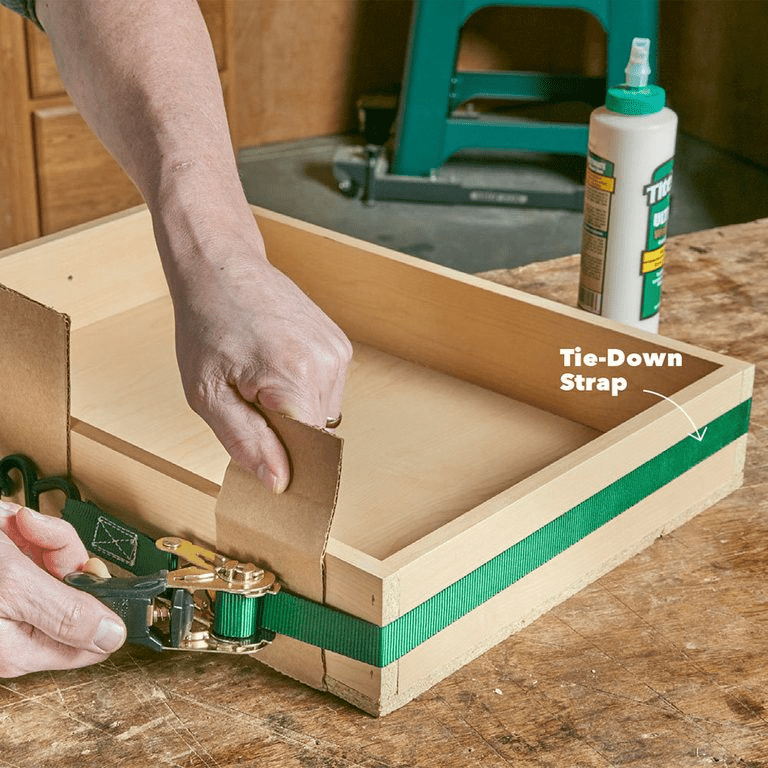
Holding things together by hand can be a pain and often lead to uneven edges. Instead, use a DIY clamp with a ratchet-tie-down-strap. It holds the edges of the box in place for you, making the job of clamping the box much easier.
19. Your Hammer Won’t Be Going Anywhere Anymore
Losing tools or not having them handy would probably be in the top five on the list of most annoying things to happen while making repairs. If you’re working alone and don’t have someone to fetch the right tools, you can set yourself up to make sure you don’t end up stuck mid-project.
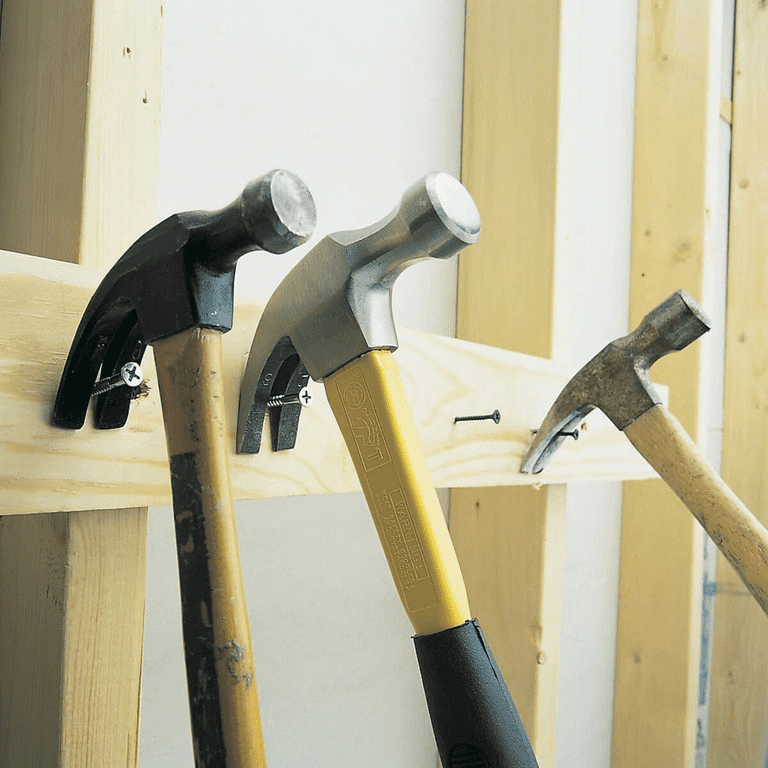
Hammers are one of those evasive tools that can go into hiding sometimes when the need for them arises. Say goodbye to the frustration of occasionally losing your hammer on the workbench. Make a DIY hammer rack with some screws or nails, as shown in the picture above. How simple is that?
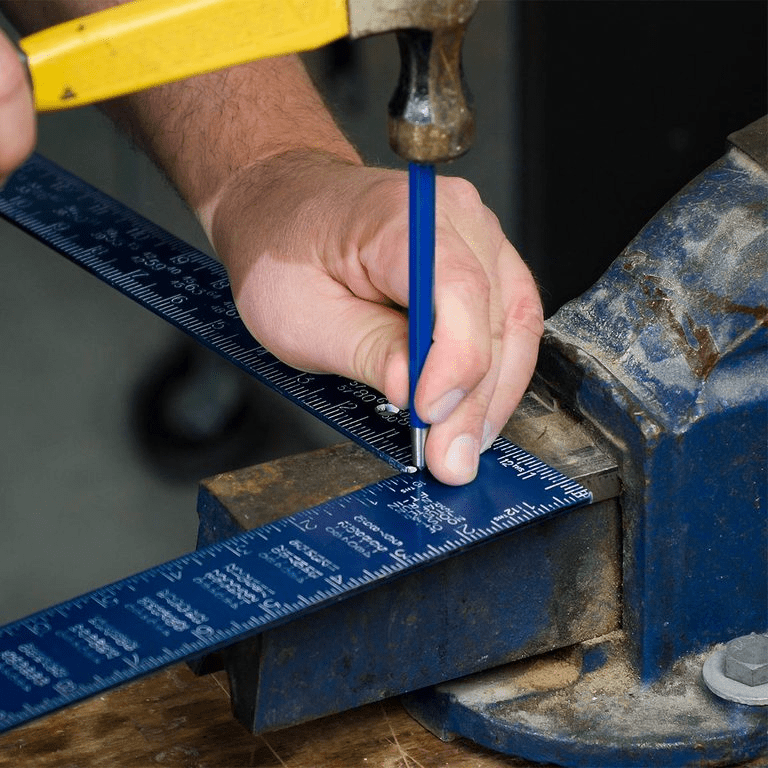
20. Simple Method for Confirming a Square Shape
You don’t have to be Leonardo Davinci to draw a reasonable circle, the difficult part is cutting out a decent shape. We often need to cut out shapes for decor, alongside other styling needs. The most common shapes used are circles, squares, and triangles.
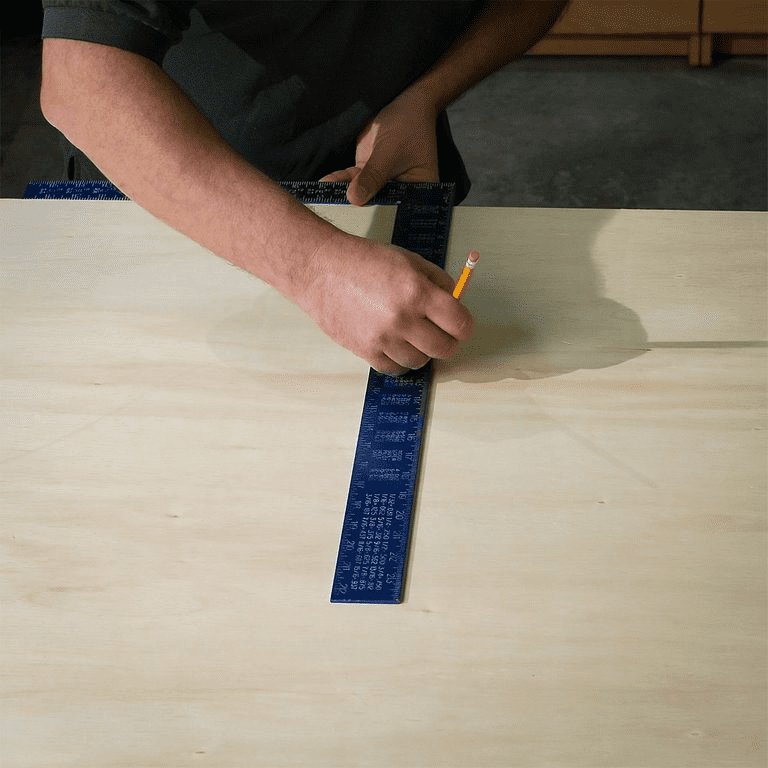
There is a way to verify that you have indeed cut out a good square. Start off by establishing a short side of your shape with factory-processed plywood. Extend a point across the long side of the square, then fold. If the lines are not aligned, your square isn’t actually a square and you’ll need to try again.
21. Too Much Painting Jobs for One Roller to Handle
Painting rooms using rollers are a lot faster and smoother than paintbrushes. Although in some cases, just one roller does not cut it. Depending on the size, amount of rooms you are painting, and how quickly you need the job done – you may need extra hands, meaning more than one roller.
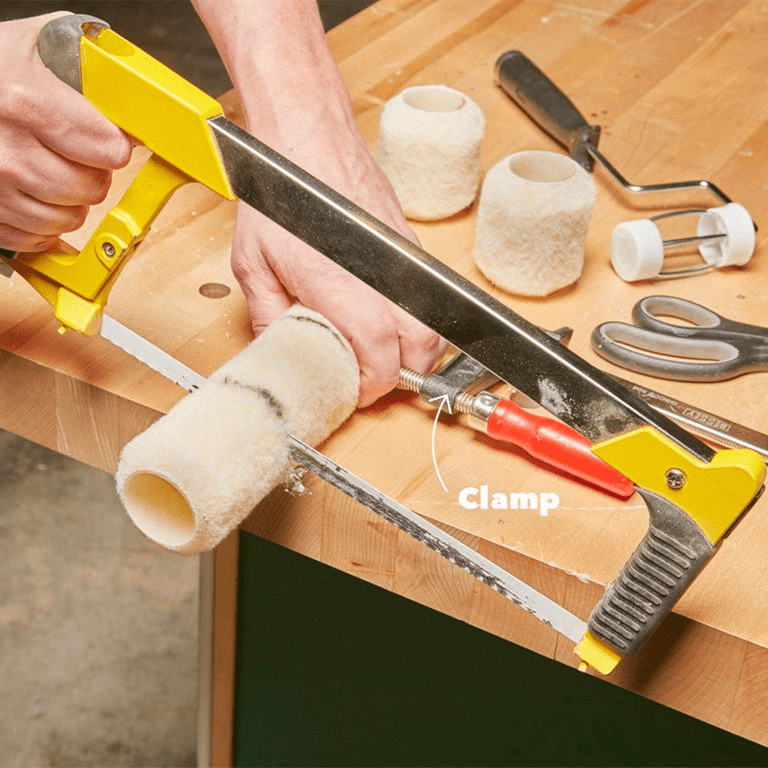
While buying more rollers solves the problem, it isn’t very economical. Here’s a simple workaround: instead of buying several rollers, buy one big one. That way, you can cut one roller into multiple equal pieces. This technique is very convenient since all rollers have the same diameter.
22. Illumination While Working
Working at night, in dimly lit rooms, or even just in tight corners, visibility can be a problem. Since we only have two hands, using a flashlight to provide illumination with one while working with the other is difficult. If you don’t want to work with a headlamp, make your own DIY worklight.
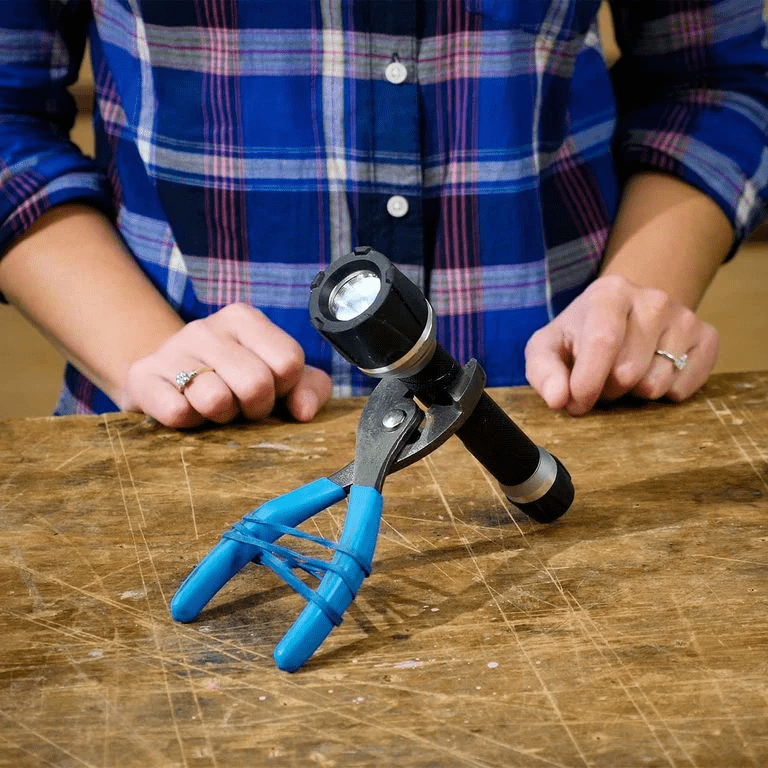
With hands-free devices, you won’t have to struggle with your light source and the work at hand at the same time. For this setup, the items you need are a pair of pliers, a rubber band, and a flashlight. The best part is its size; it’s so light and portable that you can adjust it however you need.
23. Makeshift Hammer Holster with a PVC Pipe
Simply keeping your toolbox close to your work area doesn’t always suffice. Since you can only hold one tool at a time, working on equipment that needs different tools means going back and forth repeatedly. However, this isn’t too convenient.
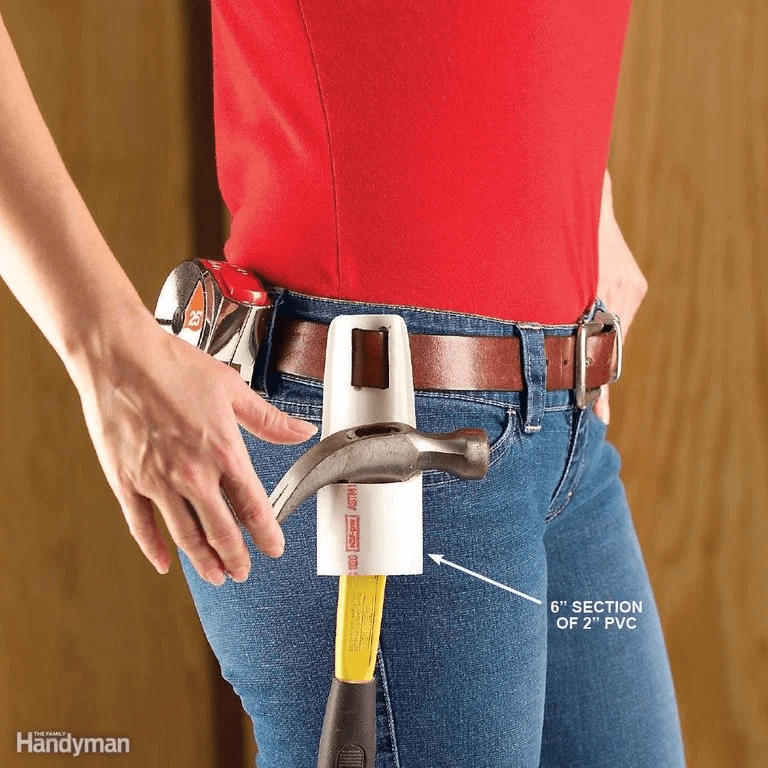
A hammer is one of those tools you are bound to use frequently during work. Work belts allow you to keep handy tools strapped to your waist while you carry on with your duties but what happens when you run out of space? With a PVC pipe, you can create a holster for your hammer.
24. Rugs for Saddles
How often have you noticed some grazes on your sawhorse after working on it for long hours? Of course, the bruises are products of friction, but is there a way to avoid them entirely? Yes, you can. They are not inevitable. We will walk you through a solution to this hitch.
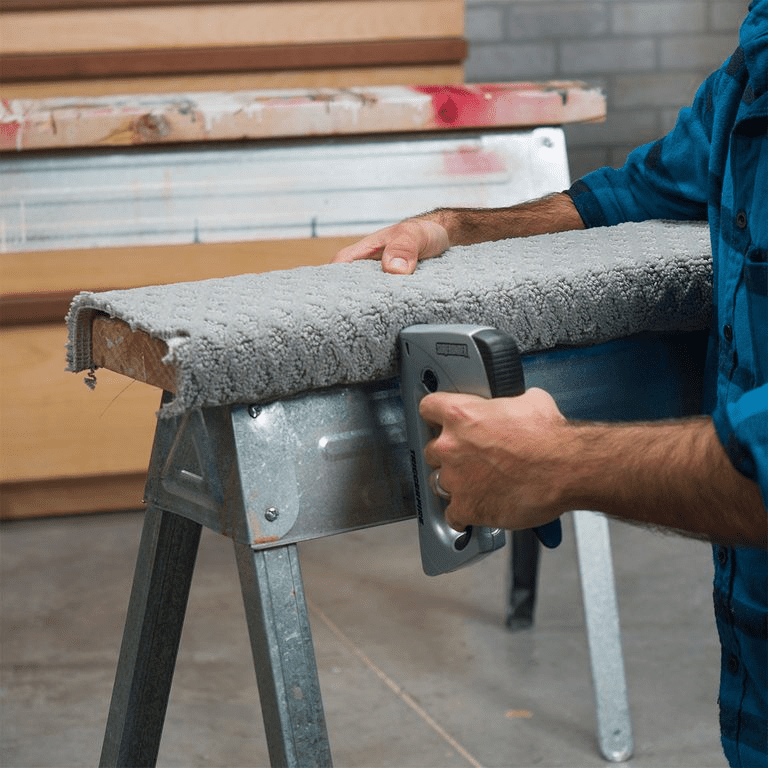
Though they’re just scratches, they can really affect one’s mood. So here’s what you can do: use a rug or any sort of reliable covering as a saddle. The picture above will give you a visual idea of how to execute this solution.
25. Hack for Hard-to-Reach Nuts
While most projects have screws, nuts, bolts, and nails within relatively easy reach, that’s not always the case. Tight corners or pieces just out of reach can slow down, or even put a halt to, any repair job. Even with a drill, there are sometimes pieces too far to reach.

If you’re caught in a jam, there’s still something you can do. The simplest solution is a multi-bit screwdriver. Exchange the tip of your cordless drill with a multi-bit screwdriver. In doing so, just like that, you have more reach.
26. Keeping Drills on Hooks
How often do you travel to a site under the assumption that you have all the tools you need to start work, only to get there and find out that you are missing a drill? You’ll have to make a miserable round trip to retrieve your drill.
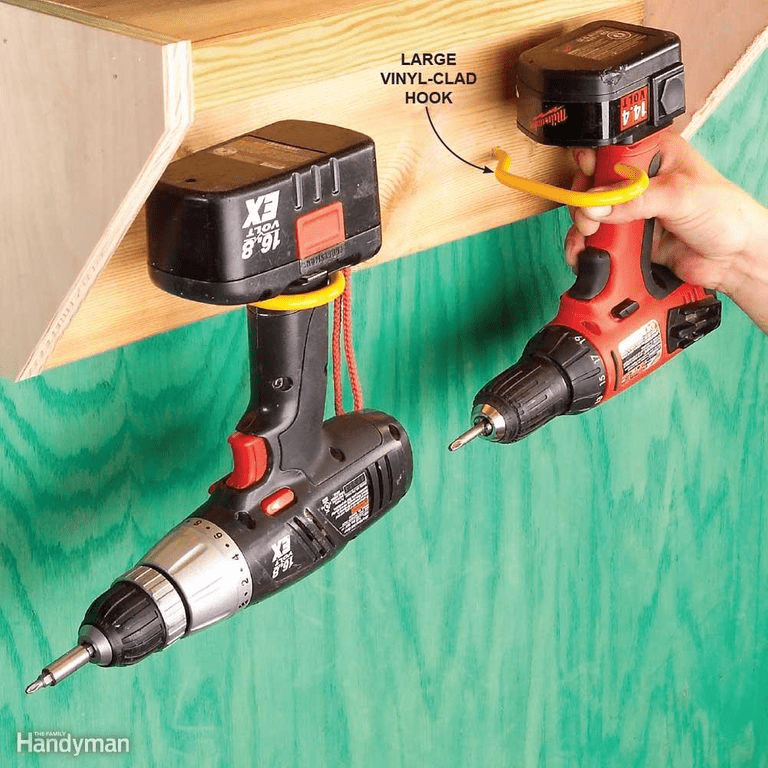
To avoid all that stress, we have a lifetime solution to this problem: hanging your drills with hooks. The picture above shows drills hung on strong hooks originally designed to hold bikes. With a setup like this, not only will you never miss your drill on the site, you also won’t have to transport it to and fro again.
27. Smaller Scaled Solutions for Sandpaper
Sandpapers are a gift to furniture builders everywhere in the world. It is the go-to tool for finishing surfaces. Resourceful as they may be, there are certain situations where sandpaper can’t help, such as narrow crevices and other tight edges or corners.
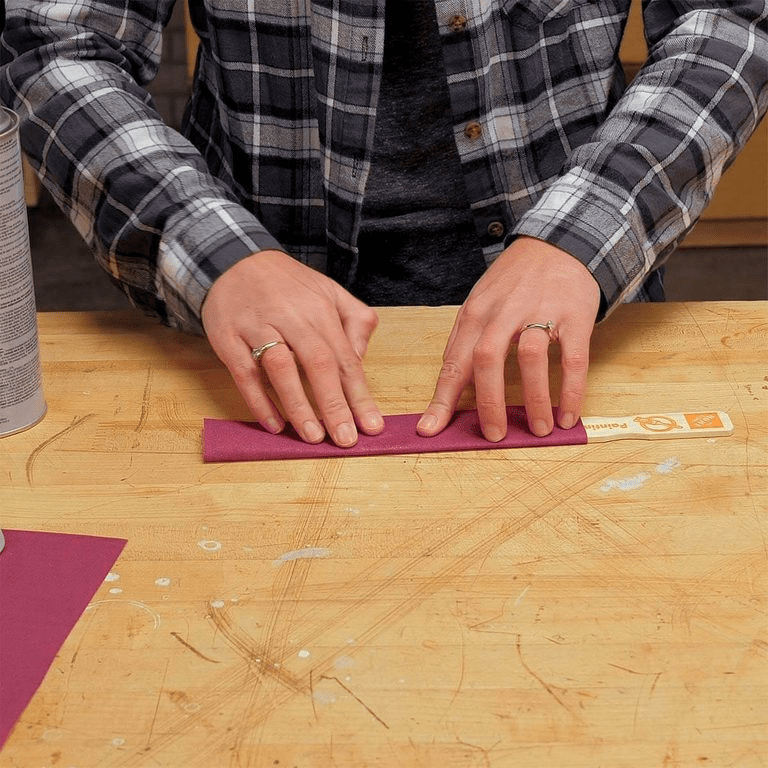
Extend the reach and strength of your sandpaper by making a wooden file. These tools are capable of reaching those awkward positions sandpaper will have issues reaching. A wooden file is composed of sandpaper, a paint stir stick, and glue.
28. Adjusting an Incorrect Square
There’s no better tool for creating a decent square shape than the square. It has the appearance of a disjointed square, with a diagonal line separating it into two halves. One thing to note is that this tool isn’t a hundred percent accurate.
They are very good for correcting erroneous squares. To this end, the only tools you’ll need are an anvil, a center punch, and a hammer. You can adjust your shape by punching the inner or outer corners faulting the shape of your square.
29. More Than Recycling
Sandpaper is an essential tool that we use on almost all kinds of projects. Sadly, they are not usable forever. With prolonged use, they wear, become untidy, and lose the friction which makes them effective. Next time you have worn-down paper, don’t throw it out just yet.
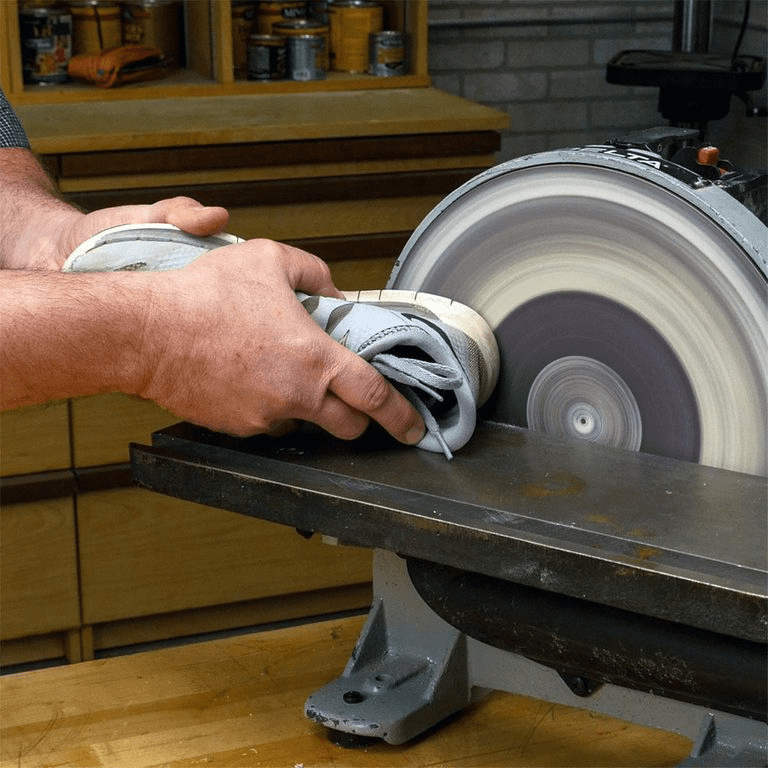
Sandpapers should not be tossed out just because it has gotten old. There is actually a way to salvage this material after it has exceeded its useful life. Extract an old sneaker that is no longer in use to layer your out-of-service sandpaper. That’s all.
30. Improvised Solution to Removing Nails without a Hammer
Hammers are double-edged swords in their own rights: they are used to both drive nails into surfaces and pop them out. But what happens when there’s no hammer around to remove a nail? Is there an improvised solution for a hammer?
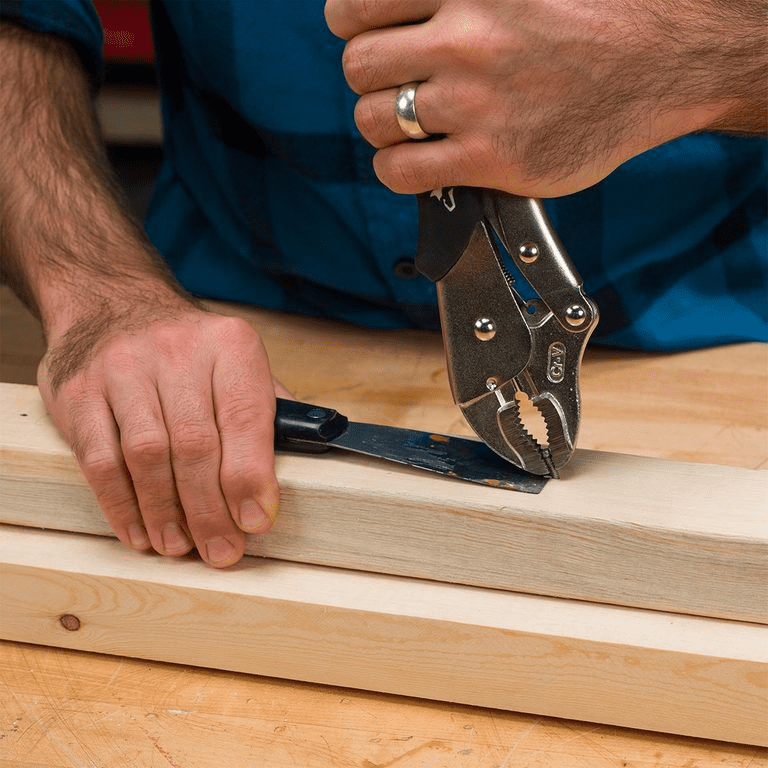
Yes; a vise grip plier could save the day. It has a strong grip that could pick nails by the head and pluck them out of wood or whatever objects they were once pinned to. Use a file to create room for the vice to properly grip the head of the nail, and you’re good to go.
31. Roof Repair? Why Not Pin Your Tools to the Roof
Doing work on a roof is truly a herculean task. Making your way up there in the first place is a challenge on its own, and then there’s restricted mobility once you’re up there. Trying to keep yourself and your tools from slipping or falling off at the same time is a rigorous multitasking process.
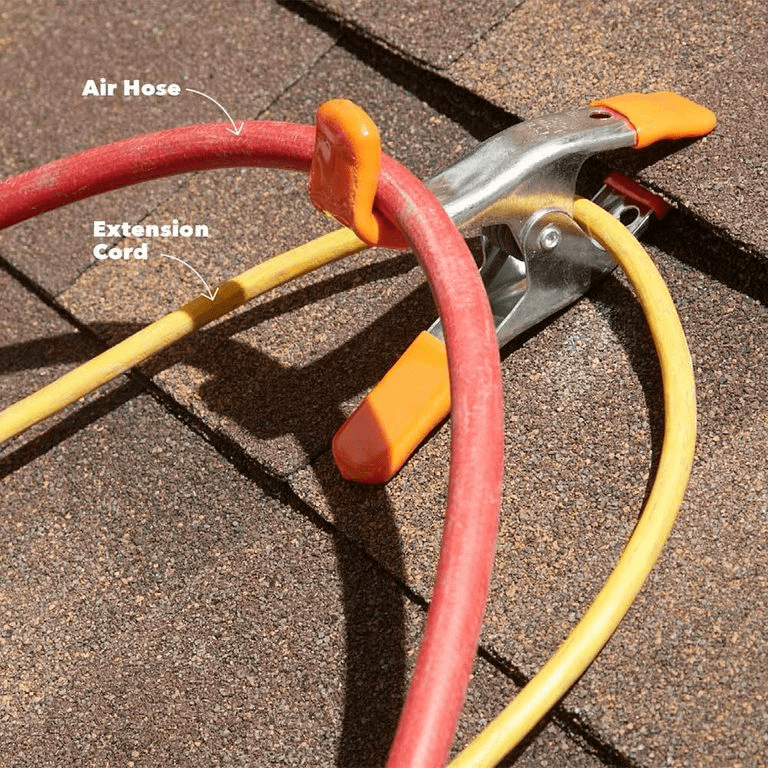
There are measures you can take to prevent your tools from falling off. You could hang your tools to the roof using spring clamps. Now that your tools are securely pinned to the roof, all you have to worry about is keeping yourself balanced on the roof.
32. Fitting Objects Too Small for a Vise
Keeping objects firmly in place is essential for all sorts of jobs done on a workbench. Virtually all work activities require an object to be securely locked in place. Mechanical vises are the best tools for locking objects to a fixed position.
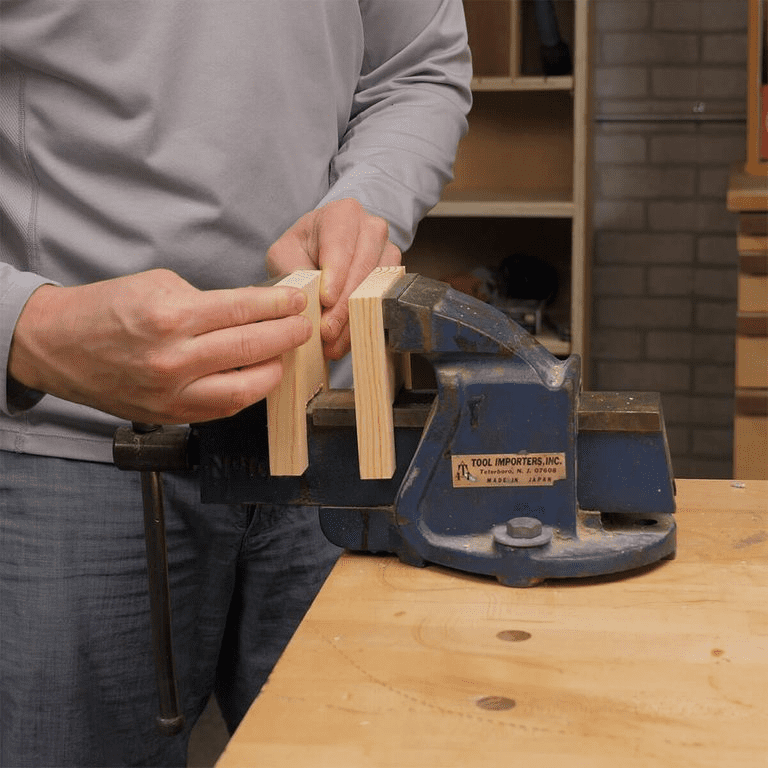
Unfortunately, some items are way too small to fit in a vise. Sure enough, there’s a way to get around this problem – stuffing up the tolerance between the vise and the object to be worked on with custom-made pads.
33. Making Decent Circular Shapes
Shapes are the fundamental elements in building endeavors. Take a look at any furniture around you right now, it’s easy to identify the shape of their body parts or the object as a whole. Therefore, knowing how to make decent shapes in a building project is essential.
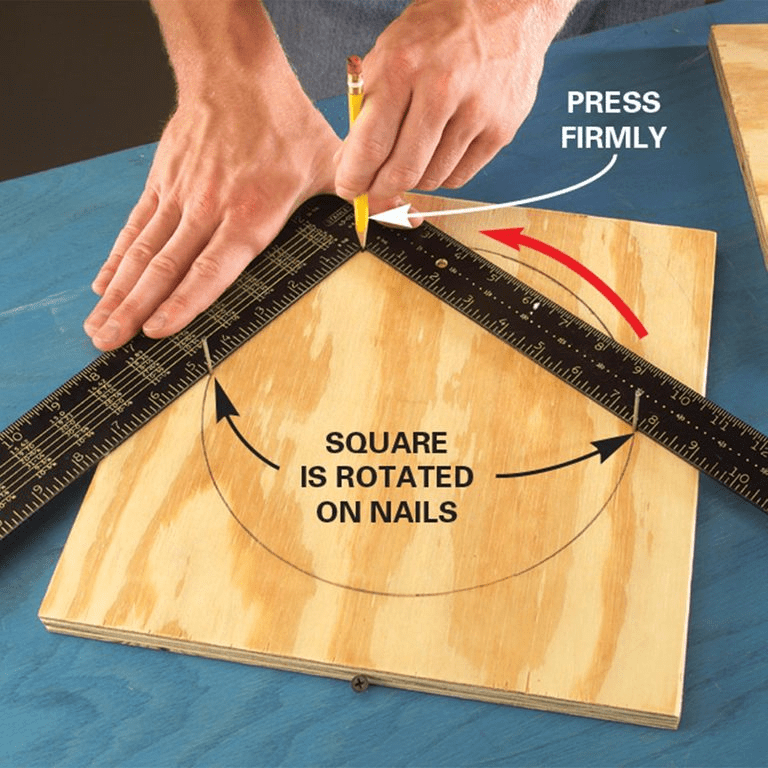
You can create a DIY protractor for making perfect circles. All you need is a square and some nails. Draw a circle by establishing its diameter with two nails. Plot the curves by rotating your squares around the circle with a pencil in its center.
34. How to Avoid Hammer Marks
If you couldn’t already tell, hammers are possibly the most important tool with any handiwork. Even if you have a nailgun, there is no substitute for a classic hammer. Even if you keep your hand safe, there’s one more downside we haven’t talked about yet…

No matter how precise you fancy yourself, your hammer won’t always hit the target. There’s a chance you might go a little to the left and right and graze a surface. Using the rubber underneath the chair legs to cushion the head, prevents the mess of accidentally marking the surface with your hammer.
35. Skimming off the Surface of Furniture
The finishing stage of a furniture design is quite delicate. You have to meticulously trim the excess on the surface of the furniture without biting into its body. Are there tools for skinning the body of furniture without harming its core?
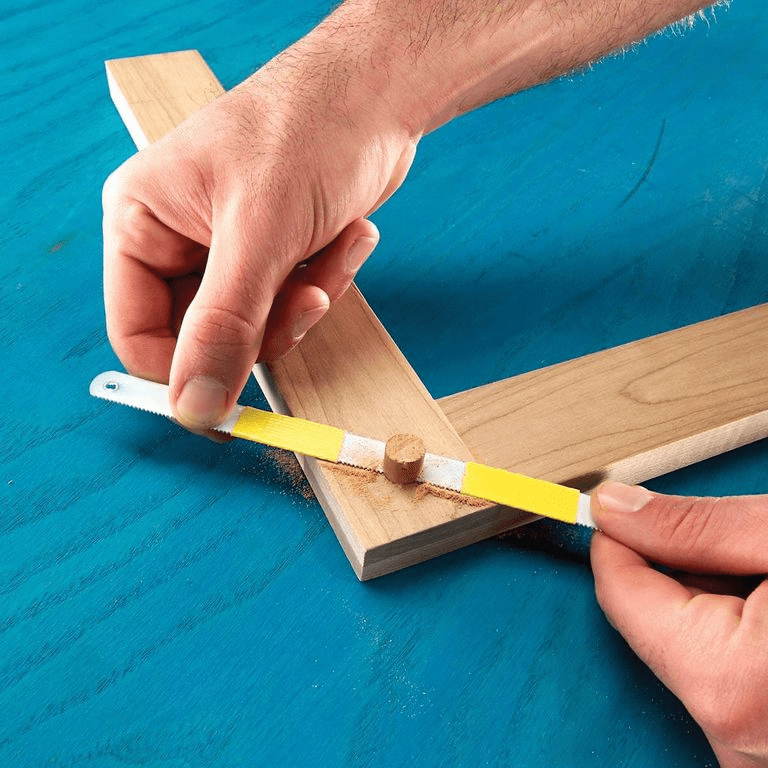
You can use a hacksaw with a tape wound around its blade. While wrapping the tape around the hacksaw’s blade, put some distance between both of them. This contraption gives you access to the coarse skin on top of the furniture without bridging into its body.
36. Options for Heavy-lifting without a Trolley
Moving heavy equipment is an inevitable activity in a workshop setting. It’s very trying to lift heavy-duty equipment like compressors, especially if you have to do it without the assistance of a trolley. Doing it by hand could take a toll on your back.
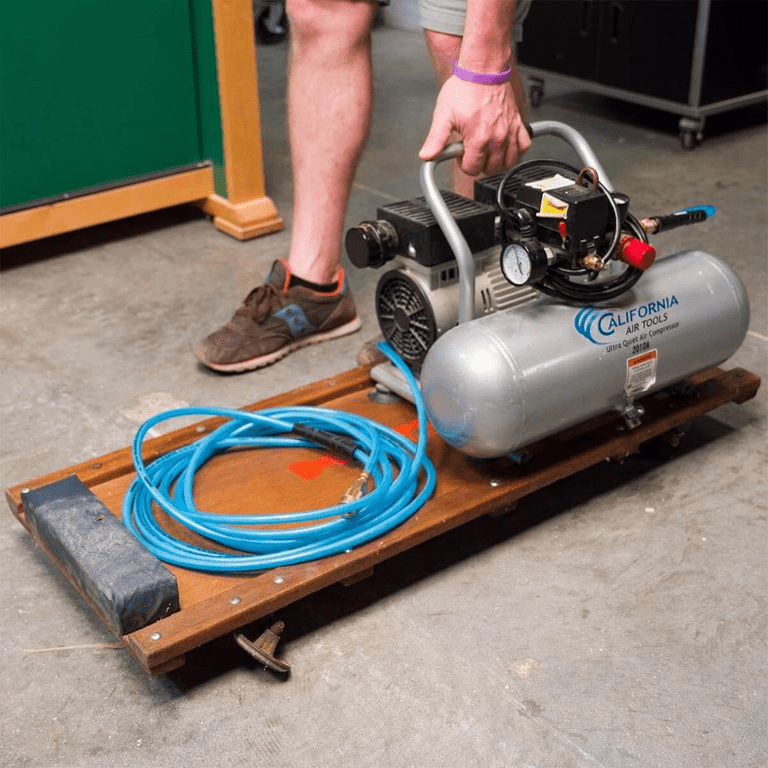
If you can’t afford or access a trolley at the moment, you can get by with this interesting hack. A mechanical creeper is an easy substitute. With this, you can move heavy equipment all over your workshop without straining your back.
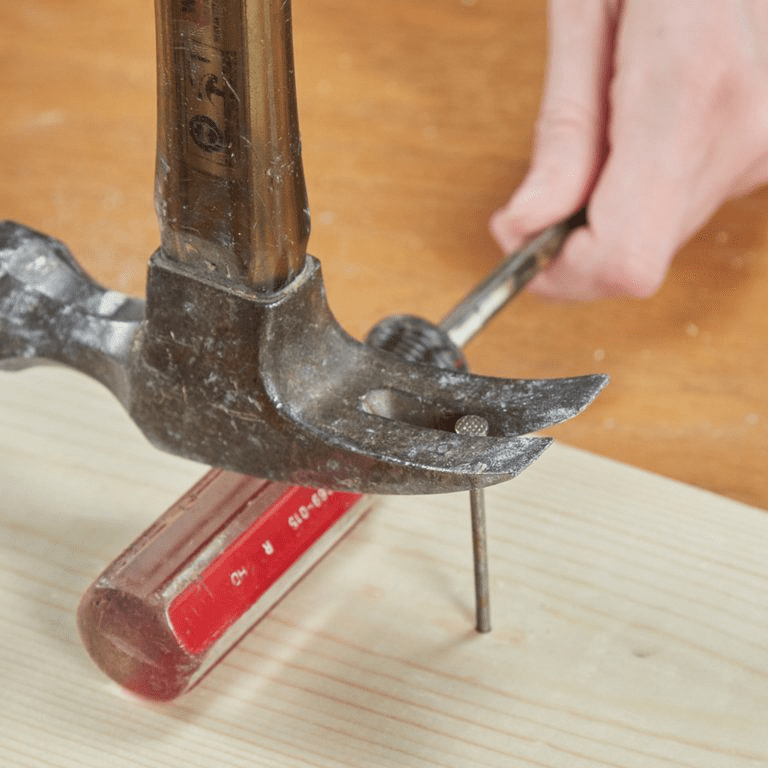
37. Dealing with a Headless Nail
Sometimes it seems like nails don’t just want to come off. You’ll struggle to get them out for a while and end up pulling the head, leaving the rest of the shaft stuck to the object. Many quit trying at this point. However, we have a way out of this kind of sticky situation.
Locking pliers and crowbars can take care of nails with severed heads. Here is how it’s done: the locking plier firmly grips the nail’s shaft at the top, assuming the position of the lost head. Hence, the crowbar can easily pop out the nail from its shaft.
38. Durable Blades
Blades and box cutters are resourceful pieces of equipment. They offer a wide range of utilities; cutting tapes, marking dimensions on a workpiece, and much more. But nothing good lasts forever right – overtime the blades wear and lose their edge.
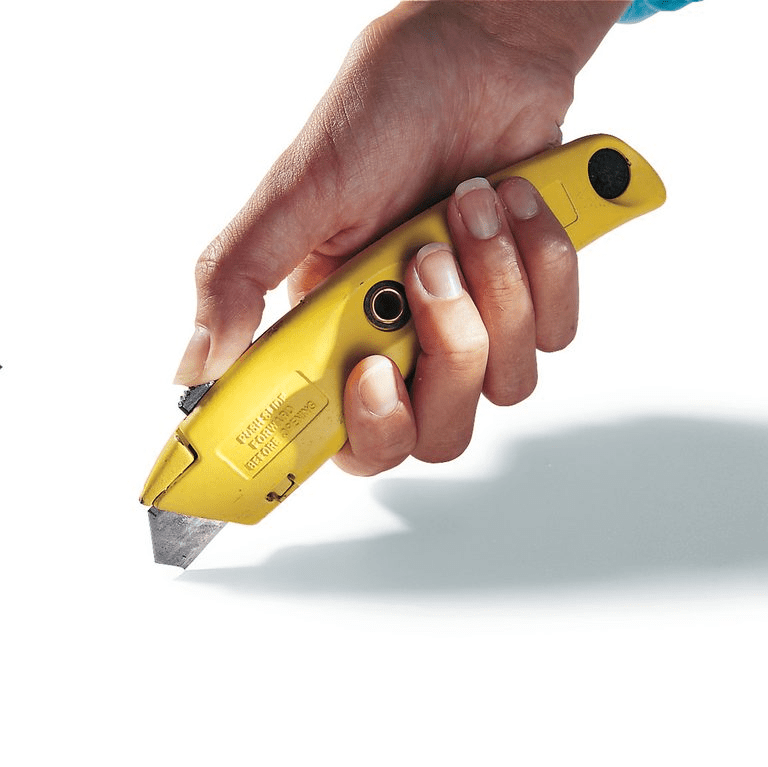
Instead of changing your blades every time they get dull, there are other alternatives – longer-lasting utility blades. These blades feature cartridges. That way, instead of buying new blades every now and then, you can simply break off used up ones on the same device.
39. What Cuts a Tree as Good as an Axe?
Axes are specially dedicated tools for cutting down trees. Using any other random blade to attend to tree cutting needs is much less effective. But what should one do then when an ax isn’t available? Is there something else that can substitute it and provide a similar cutting efficiency?
There is, in fact, another tool for comfortably dividing wood sitting unattended in your workspace. The sharper end of a hammer, its claw, can be used to chop wood seamlessly. Now you don’t have to be on standby till an ax arrives.
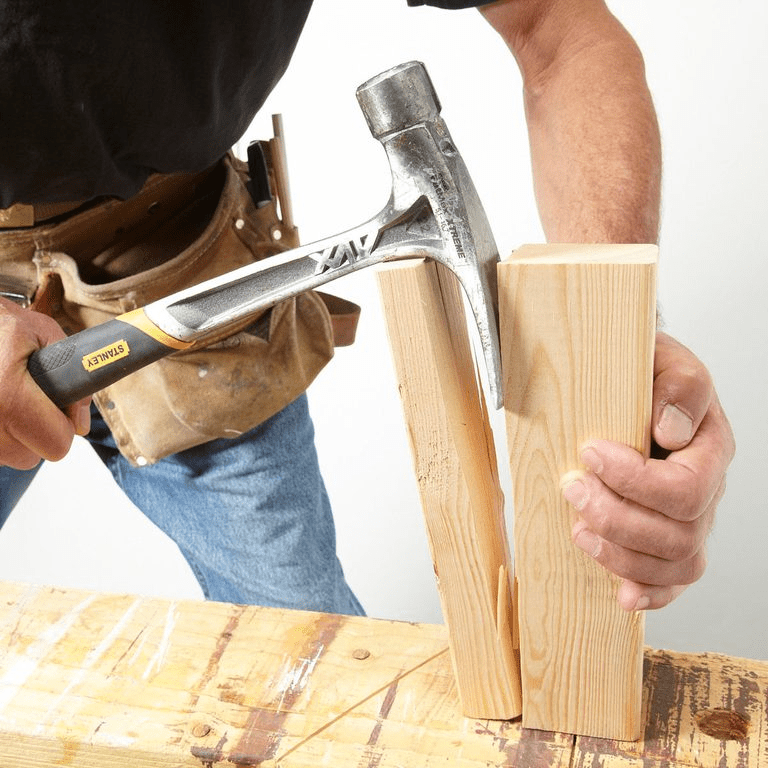
40. Protecting the Beauty of Your Work
Complete control over a hammer swing is not possible. Unless you have more than 5 years of experience doing woodwork, it’s natural for you to miss the head of the nail by a few centimeters in random directions. Unfortunately, missing the mark comes at a cost – the surface you are hammering on suffers some damage.
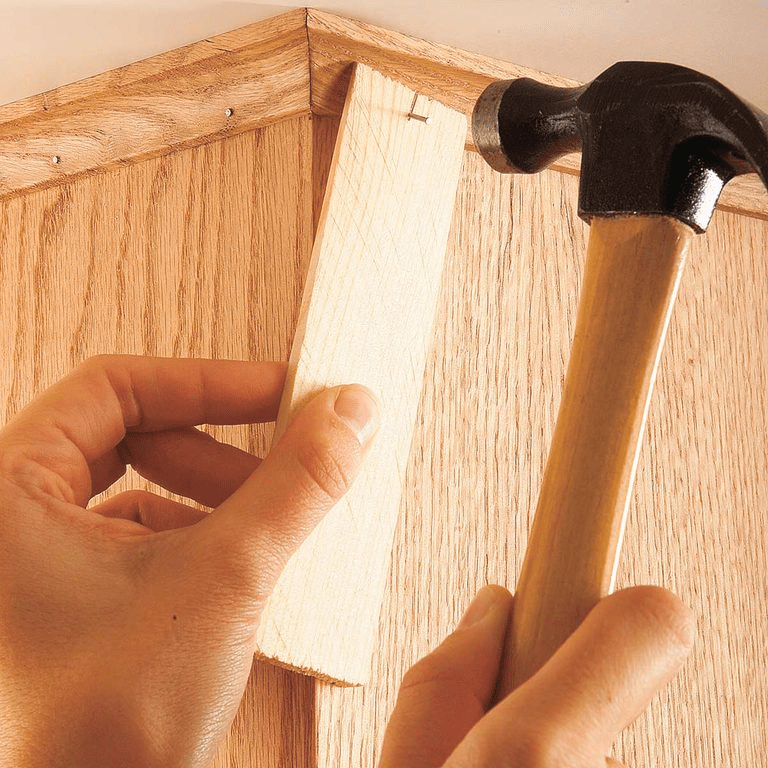
You can avoid unwanted contact on your work with a wood shim. Protect the areas of the object exposed to missed hammer swings by cutting up a wood shim to cover it. With this extra layer of protection, your work is safe from accidental damage.
41. Preserving Your Shiny Metal Tools
The natural process of metal rusting is inevitable, especially if you work outside a lot. Even inside, it’s still a little upsetting to find your once shiny tools without their store-bought sheen, and even take on different shades of brown.
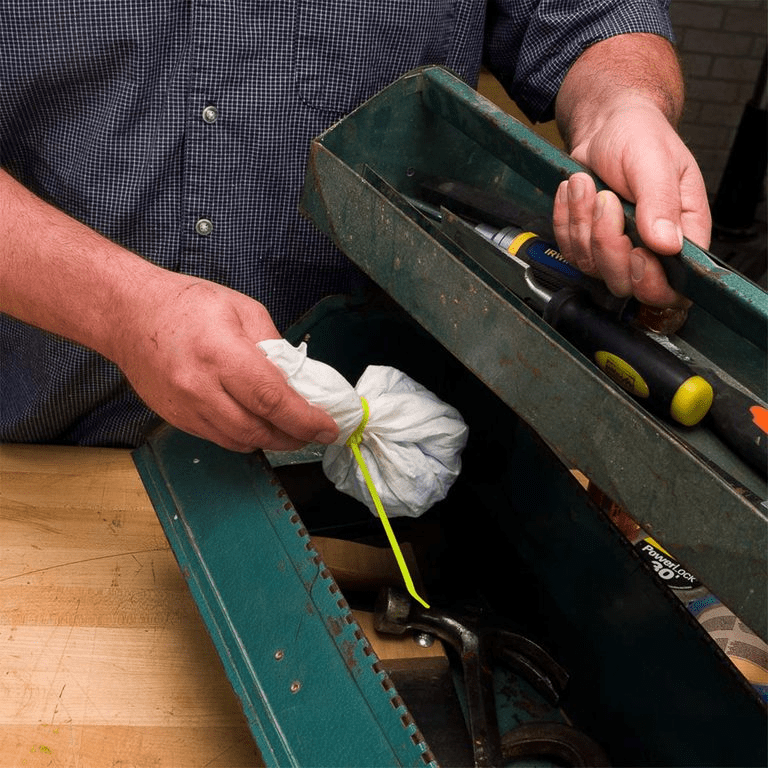
If you like your tools to maintain their glossy body, there are preventive measures you could take to protect them from rust. Toolboxes provide some protection for your tools quite alright, but to really take out chances of rust formations, put silica crystal kitty litter amongst your tools in the toolbox.
42. Put Together Your Own Awl
Awls are a staple hand tool for creating holes in drywalls. In a box with dozens of tools, it would be the one picked out for punching holes, given how efficiently they do the job. Unfortunately, awls are sometimes too small for the task at hand.
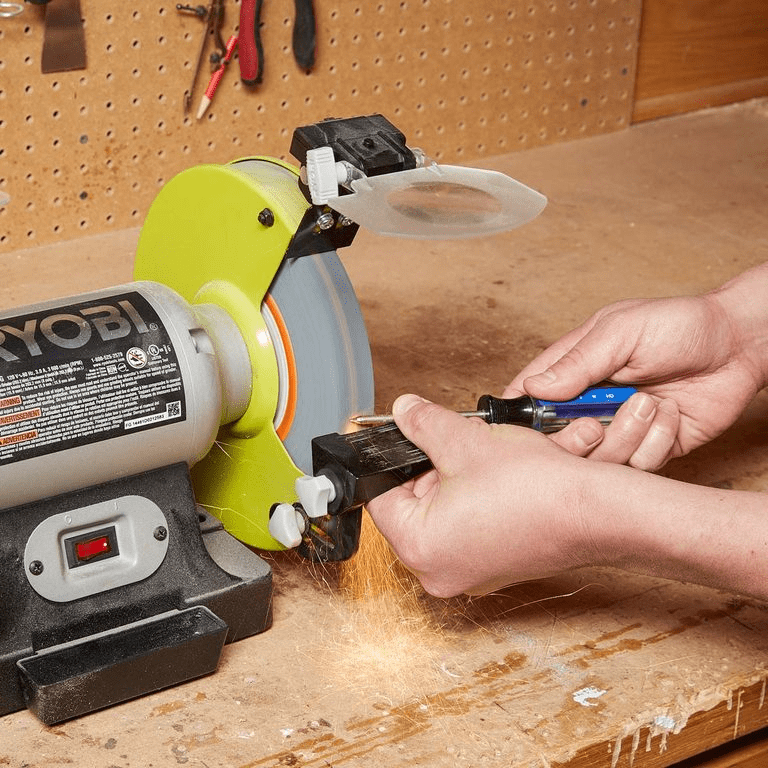
This could be a problem for people with big hands. Getting a good grip while using them could pose a challenge. Good thing is, you can make your own awl with a size of your preference. All you need is a screwdriver with a disk sander or bench grinder.
43. Easier Planing
If you asked anyone in the workshop what the most back-breaking tasks are, you get ‘planing longboards’ three times out of five. It takes careful attention, ensuring that the surface is well leveled. Planing longboards means repeatedly inspecting the infeed and outfeed. That’s a lot of work.
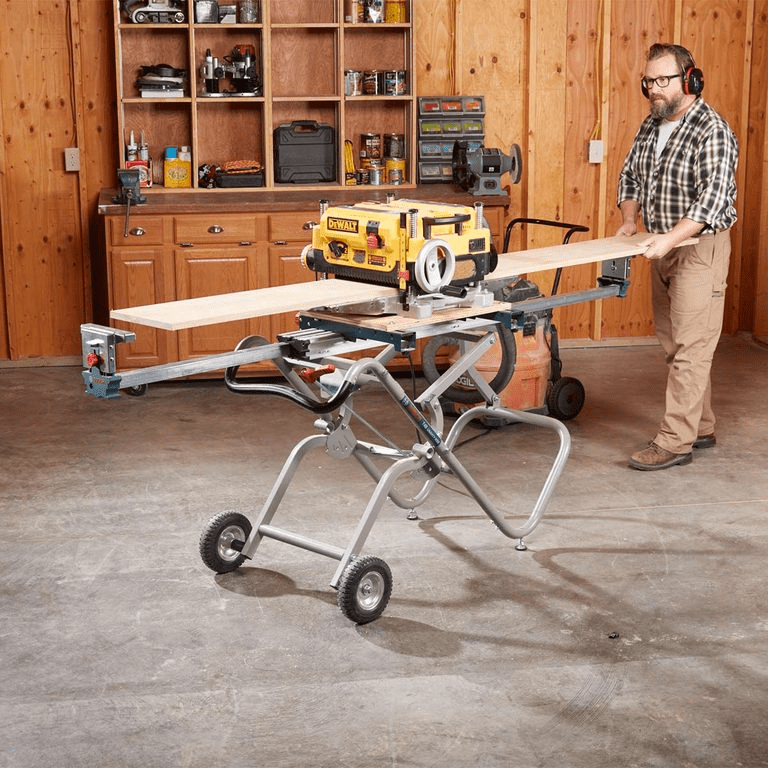
Use these simple steps to ease the burden of the exercise. Fix your portable planer to your board; next rig the board to a miter saw strand, which assumes the duty of an infeed to outfeed for planing. It’s as simple as that!
44. Personalizing a Chuck Key
Usually, chuck keys give users control over the tension in gear systems. However, they may serve other purposes, depending on what they are designed for. Sometimes, their short handles make them hard to use. Which begs the question if users can somehow create a custom length.
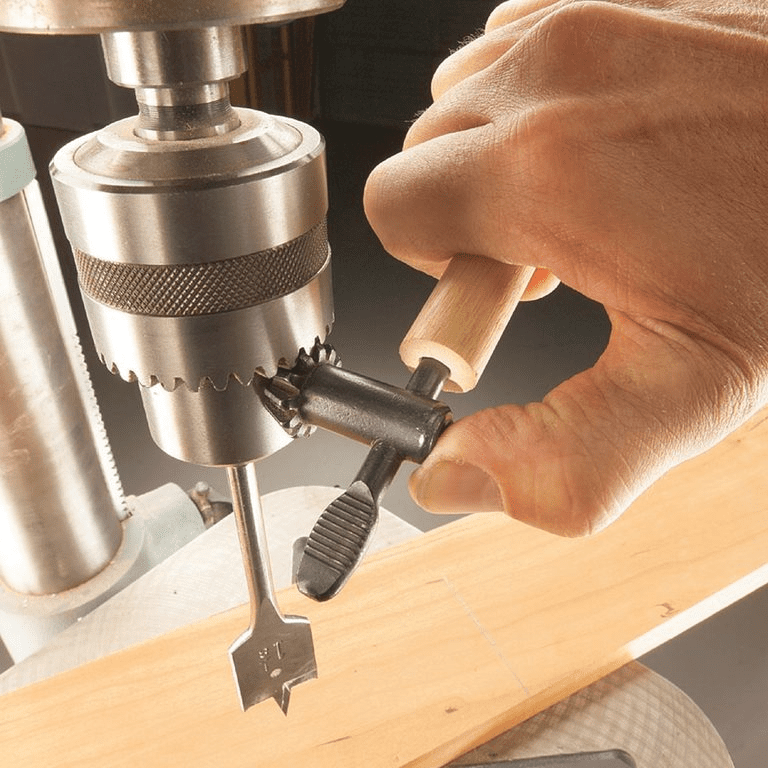
You can create a custom-made chuck key. What you need is the length and diameter of the key’s handle and the area of the key’s hole. With that, anytime you operate the key, you now have more room between your hands and the gear.
45. Using a Drill to Brush
For the most part, this list has mostly revealed hacks for workshop practices. But we also need hacks while doing home repair using workshop tools. But tools aren’t just restricted to professional workbenches. Here is an interesting improvised solution for home applications.
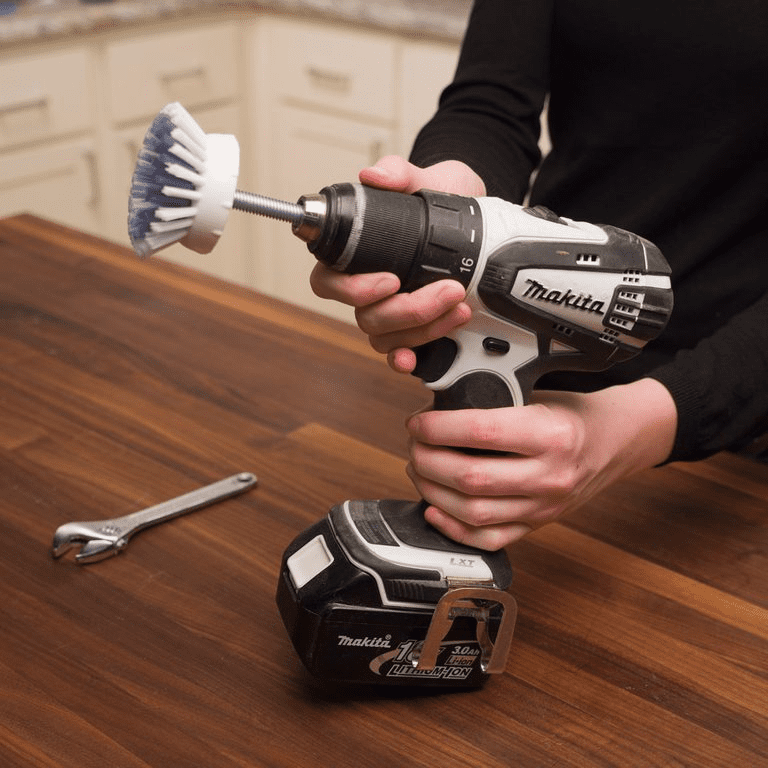
Usually, people clean stuff using their hands and brushes. The good news is, you can brush with ease now using a simple hack. Just replace the tip in a drill with brushes. That way, you can efficiently scrub stubborn surfaces.